Alot of my projects this year have been focusing on decorations for my house. There are a couple of reasons for this. The first one is because I got tired of lugging all my Halloween stuff with me every time I moved, so before we sold our house in South Carolina and moved here to Washington, I had a garage sale and got rid of all the little kiddie decos. You know how you can accumulate to the point that you just get tired of looking at everything? Well, that is where I was at the time and I just kept what I truly loved.
The second reason is because alot of my old decorations were truly scary and meant for haunted houses or older kids. My oldest two loved them, but my younger two are at the point that all of the gore and grotesque stuff that usually comes with Halloween really scares them. All the creepy masks, scary movies, and spooky props are really starting to make them have a bad association with the holiday, and I definitely don't want that as it is my favorite time of year! I want them to love it as much as I do and celebrate it for what it truly is.
So, I've really been playing up the eerie, subtle creepiness this year rather than outright scariness. I am almost done completely with my Halloween room and will share pics soon, but for now I have a witchy sign for you.
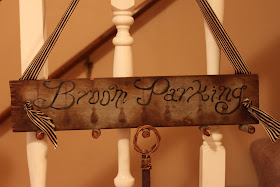
I started with a scrap piece of lumber that was hidden in the bottom of my wood burning pile out back. The renters must have thrown it down there, and they said we could use the wood, sooooo I used it. It was already pretty aged, so all I had to do to it was add some brown distressing ink around the edges. I drilled a hole in each side, and attached some ribbon to hang it. Then I stamped a broomstick from Third Coast using the same distress ink in a row across the wood. It's very faded, but I wanted it to be like that to make it feel old. I thought about adding color to the brooms, then decided against it.
Then I took black paint and just lettered my sign; it says "Broom Parking".
This sign is hanging in my entry way for convenient parking all around. The final touch was to add my pegs, which are just a fallen tree limb that I cut into equal lengths and nailed to the bottom. You can see that I have a decorative broom hanging from the middle peg. I actually have a couple of brooms that I need to pull out, one of which needs to be re-sewn with new broomcorn, but you get the idea.
I know the stamping technique is minimal, but I think this is just a sweet decoration that the kids are loving, and I love it because it is whimsical and simple. I may leave it up all year! I am debating on adding some sort of dried flowers or something to either end, but I haven't found anything yet that I like. I'll keep an eye out. Or maybe if someone knows a good 3-D paper-flower tutorial that they can pass along... I don't really know how to make paper flowers (can you believe it?)
You know, since we are on the subject of brooms, I heard that Witch Ivy from Wild Flower Kids has lost hers! Maybe you can spot it today on one of the Wicked Blogs listed in my sidebar. If you do, be sure to email me and tell me where it is. I'll compile all the names of those of you who do and I'll draw for a winner tomorrow, who will receive a Witch Ivy digi courtesy of Wild Flower Kids!
Off you go, and have fun!


i'm gald you didn't color in the brooms! it has a very old world feel, wonderful!
ReplyDeleteI totally need broom parking at my house!!! Really REally badly!!
ReplyDeletewow fantastic terra,i totally love your broom...
ReplyDeleteReally cute Terra! Love the rustic charm! xxD
ReplyDeleteThis is awesome! The subtlety of your stamping is perfect, and I really like the ribbon you used! I may have to make one of these myself, as I have an exquisite broom someone made for me. Thanks for the idea!
ReplyDeleteomg that is darling!! I may have to steal this idea. I have a broom hanging on my wall...:)
ReplyDeleteI love your sign your room is going to look so cool
ReplyDeleteLuv Jane xxx
Didn't see the stamps until later - this is so totally cool! I think hanging dried flowers is an awesome idea.
ReplyDeleteWhat a lovely broom and broom rack! Perfect for a ritual sweeping!! Such a clever and practical project!
ReplyDeleteoH I've got to make one of these, I love it. and the broom stamps are just right.
ReplyDeletelove that there is a broom 'parked'. Fabulous Terra~!
ReplyDeleteI am so going to make one of those! I collect brooms (I have the coolest little one that I brought back from St. Thomas!) and this would be perfect for displaying them!
ReplyDeleteThanks for sharing!!!
That is a sweet project. I would leave it up all year round.
ReplyDeleteThis is just right for the kids to see that not all halloweeny stuff is scary. It's downright beautiful in it's simplicity, and so useful.
ReplyDeleteHelen xx
Fabulous! I have store bought sign like this, but I like yours WAY more! That broom stamp is perfect too!
ReplyDeleteI love the broom stamp perfect touch! I have seen some signs like this around but they were all cutesy and not rustic like yours...I love it!
ReplyDeleteWhat an awesome project!! Loved it, simple and with such fun impact!
ReplyDeleteThanks for sharing!
Kisses from Nydia.