Showing posts with label DT Throwdown. Show all posts

Wednesday, June 26, 2013

Design Team Throwdown #6- Danse Macabre


Hello everyone, thanks for visiting today and checking out the Smeared Ink Design Team's entries for the 6th Design Team Throwdown. If you don't know what the throwdown is, please visit Smeared and Smudged here and get all of the details. Basically, each month different Design Teams compete against each other by making fab projects, there is a round of voting to choose the winning team, and then the winners choose the next month's challenge. It's a super blast and the Smeared Ink DT has really enjoyed participating with all of the awesomely talented DT members from all teams!

This month our Challenge 5 winners, Airless Chambers DT, chose the theme of "DANSE MACABRE". All participants were to interpret the theme how they wanted to and show how they view the universality of death, or "Dance of Death".


Without further ado, here are the Smeared Ink DT entries.


#1 Our first entry comes to you from Susan:


Susan rocked out a mask of death using the skull front from Smeared Ink's Anatomy 101 set. To check out all of the details on Susan's project, please visit her blog here.


#2 Our second entry is from Helen:


Helen created a whimsically wicked mobile using images from Smeared Ink's Venice digi set, Danse Macabre digi set, and the Dead Dancer singles. To read more details, please visit Helen's blog here.


#3 Our third entry was done by Terra (me! ):

For my Danse Macabre project, I altered a yoga mat using images from Smeared Ink's Anatomy 101 digi set, Old King Cole from the Framed Rhymes set, and the Falling and Pointing Dead Dancers singles.


(my daughter posed so you can see how big it is, she's as tall as me)

I have to say this is one of the most frustrating projects I have ever made, even though the end result looks pretty simple. I have NO IDEA what possessed me to alter my yoga mat, other than I was just tired of looking at the plain, boring thing. It ended up taking way longer than I had anticipated, and I am definitely the reason the Smeared Ink team post went up last minute. Well, at least I can say I finished :)

I started by altering the King Cole image by inserting the Anatomy 101 skull as the face and changing the word to say "Danse". Then I printed out my new pimp daddy death image (Cole + Skull) and the two dead dancers, but I had to super-size them to fit on more than one paper. Cole took four pages (he's big), while each dancer took two. That in itself was an issue because my printer gave me problems and didn't size them right the first few times, but finally I got it right.

Then I took my images and did image transfers using modge poge onto my mat. I've never done this type of transfer successfully before on anything other than paper or canvas, so it was a learning process. Unfortunately, my placement of "Pimp Daddy Death" was not dead center at the top of the mat, but oh well. After completing the transfer, letting it dry, etc etc, and removing the back layer of paper, I was able to faintly see my image lines. Then the painting started. It took FOREVER to paint just the three images, and I even left out some of the image lines as I saw fit. I had originally transferred on all 5 of the Danse Macabre skeleton images as well (Smeared Ink), but before painting I scraped and peeled them off because I didn't like how they looked.

After I finished with my three main images, I decided to spray paint my mat edges with red and black, and then paint on my roses and swirls. It was a combo of freehand and a rose stencil. I've never used a stencil before, another first for this project, but I think it still came out decent. The roses have between two and four layers of paint. Finally, to finish off the mat and prevent the paint from peeling off during use, I applied a clear varnish over the whole thing.

If you're wondering if I'll actually use the mat, the answer to that is HELL YES, after all that work I better get some use out of it, lol. I hope you've enjoyed reading about my project, and please visit the other members of the SI team on their blogs to hear all about their creative processes and let us all know what you think.

Good luck to all of the teams playing in the Throwdown this time around.

PLEASE COME VOTE for your favorite THURSDAY, FRIDAY, and SATURDAY! Voting will end Sat midnight. 

Wednesday, March 27, 2013

Dt Throwdown #2- Smeared Ink Entry

Hello everyone! Thanks for visiting today to check out the Smeared Ink team entry for the second DT Throwdown Challenge on Smeared and Smudged! If you don't know what the throwdown is, please come by and visit the S&S Forum. We have the best of the best Design Teams playing against each other in a friendly and fierce bi-weekly competition. We'd love to have your DT join in as well, and if you are not on a DT, we'd love to have you come and voice your opinion by voting for the winner!

Voting for this challenge begins tomorrow, so please be sure to swing by and cast your vote for your fave team projects after you check out all the eye candy presented by the participants. Of course, we'd LOVE it if you choose us to win, but we encourage you to vote for the projects (team) that you think are the best :)

So, without further adeu, here are the Smeared Ink entries for this round!


The theme for this challenge was Faux Finishes. We were tasked by the HDH Team, who won last weeks challenge, to create a project with some sort of faux technique used on it. Don't forget, you can click on any picture to see it closer.

#1 Our first entry comes to you from Anna.


Anna decided to use a Faux Metal technique, and used stamps from Smeared Ink's Quoth The Raven and Bloody Valentine sets. Visit Anna's Blog for more details about her project.


#2 Our second entry, for your viewing pleasure, is from Leigh.


Leigh used a Faux Ancient Stone technique for dominoes and she made both a pendant and a magnet that feature stamps from Smeared Ink's Quoth The Raven set. To view the details of Leigh's project, please visit her Blog here.


#3 The third and final project for Smeared Ink's entry is mine. 

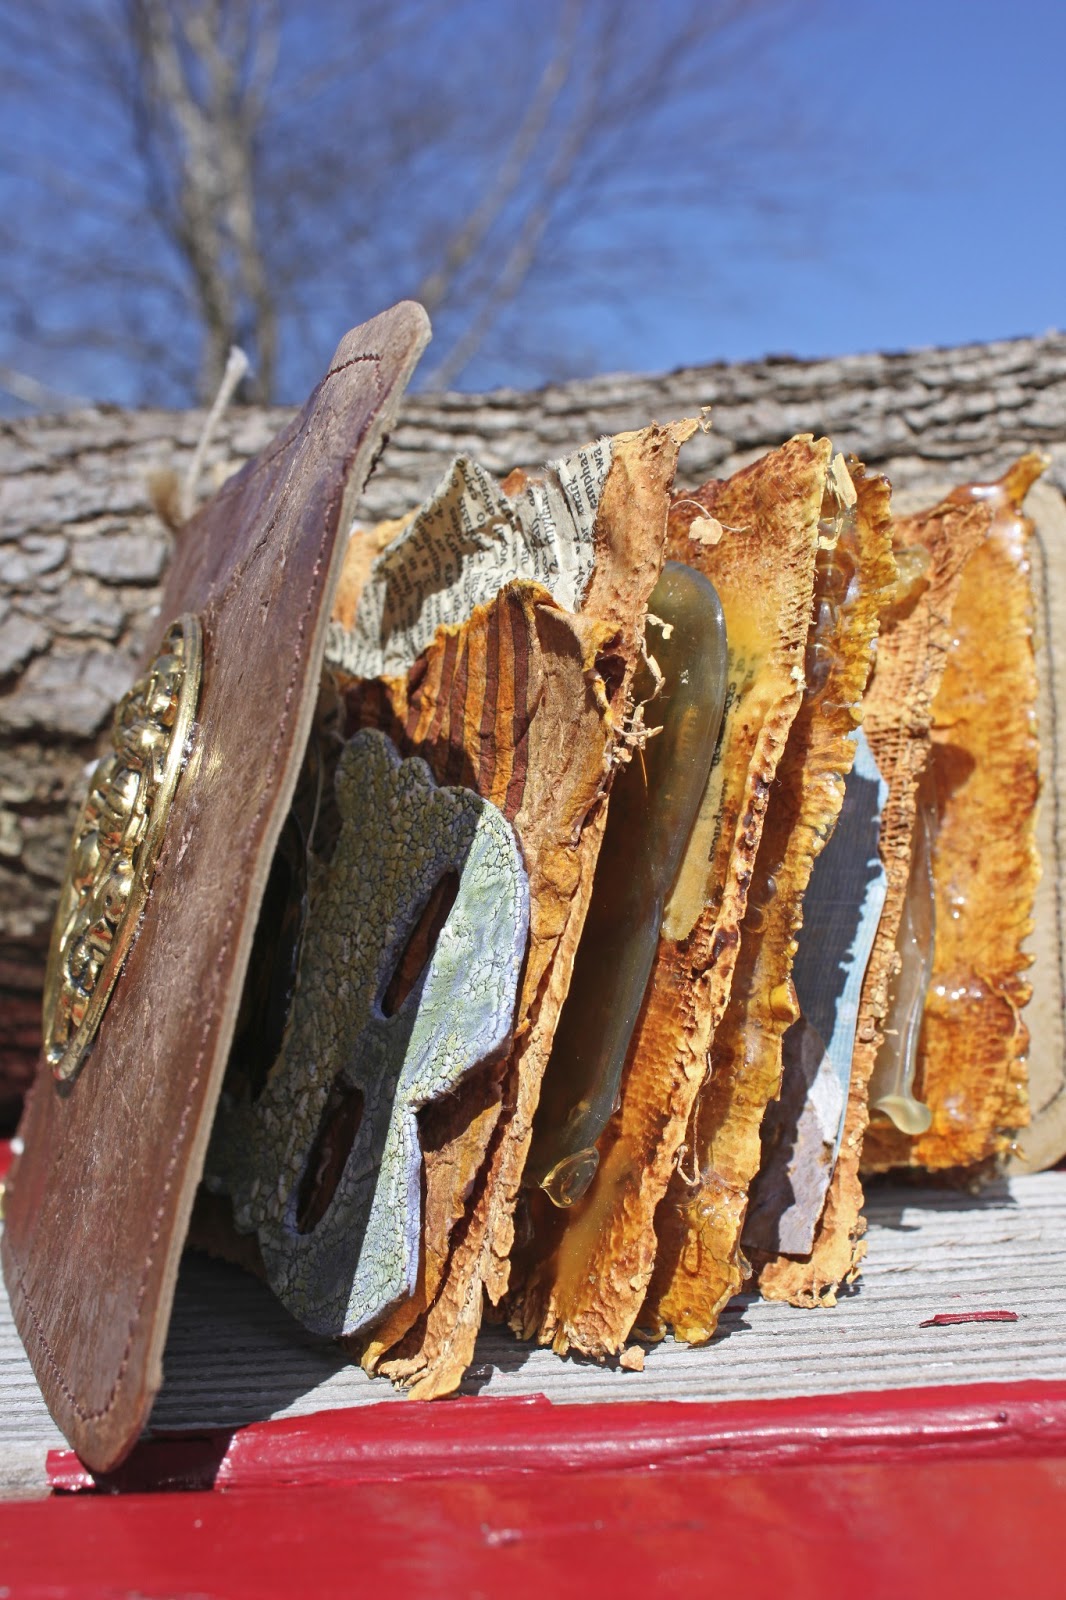
I must warn you, this entry is picture intensive, but you'll see why. I decided to make a plaster gauze book with a Faux Leather cover. Here are the pics and details.

Anyone who knows me knows I LOVE bees. I have such respect for them and really feel an attraction and calling to be around them. Of course, if they get too close without me knowing I will freak out, but more from surprise rather than fear. Anyways, this book is a sort of "shrine" book for my beloved bees.


Here is my faux finish piece of this project- the faux leather cover.

On the bound side of the book, I have my jar along with some other goodies. I am a little peeved about this jar and I'll tell you why. I have a bee (yes, a real one) that I have saved to use in the "perfect" project. My youngest daughter was stung about a year ago because she stepped on it in the grass. Poor baby, but it was not too bad. For the bee, well, it turned out not so good. Not only did the poor bee get stepped on, but he also died because, well, bumblebees die when they sting. Well, I kept the bee, which some may think is demented but oh well. When we packed up a few months ago to move, I put him in a safe place so he wouldn't get squished by the movers. Well, when I put stuff in a "safe" place, I tend to forget exactly where that place is, and having everything packed and unpacked just added to the problem. I can't find him. So, here my jar sits with a few screws in the bottom of it, waiting for it's bee. When I find him, this is where he'll go...


 So now begins the inside of the book. I've used stamp images throughout from a Smeared Ink set that will be released THIS FRIDAY. If you'd like to see sneak-peeks of the set, visit our Facebook page. Then visit the Smeared Ink shop on Friday to see this as well as a few more new release sets.

In addition to regular plaster gauze pages, I also have what I like to call faux-mica pages. They give the feeling of mica and also have the look of honey or bee resin.

Here you can see the separate "clear" page.


On this page I used beeswax to collage my pieces.

Some pages have journaling on them, and the blank pages are meant to hold pictures or mementos which will be added as time goes by. You can see the texture of the gauze.

Here's another image from our new set, along with some other goodies.


Another of our new images on a faux-mica page.

The final page in the book has metal covered in beeswax in which I've carved a thank you to the bees.

And there you have it!


I hope you've enjoyed taking a look at our projects. I'd love to hear what you think about the bee book, and if you haven't yet please visit Anna's and Leigh's blogs and let them know what you think of their projects as well.

Good luck to all of the teams playing in the Throwdown this week, and PLEASE COME VOTE for your favorite TOMORROW or FRIDAY!